Woodworker's Journal 2004 Summer, страница 50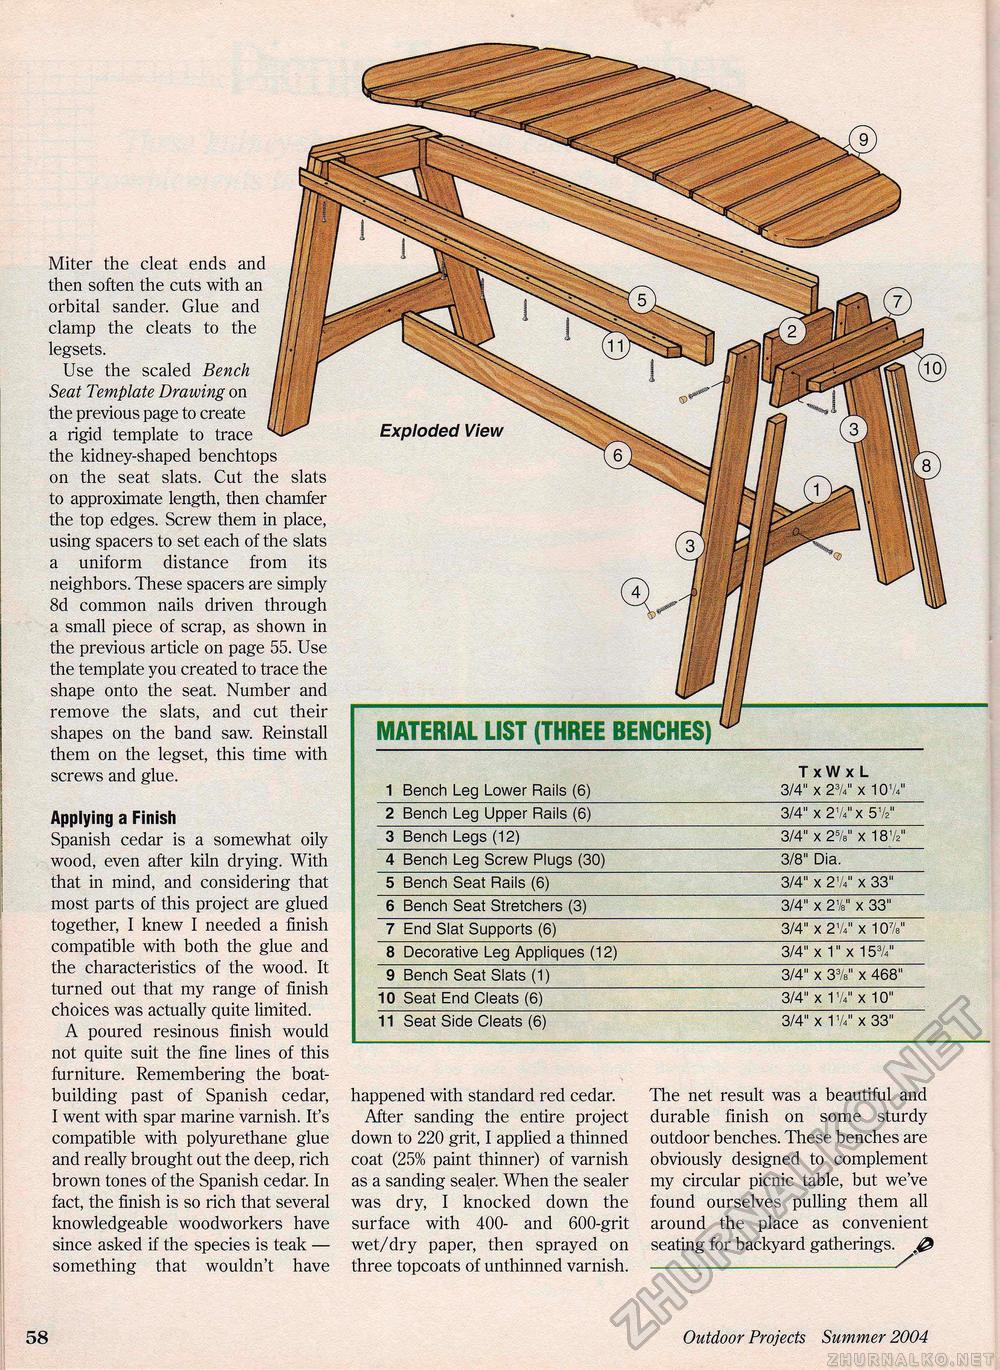
Applying a Finish Spanish cedar is a somewhat oily wood, even after kiln drying. With that in mind, and considering that most parts of this project are glued together, I knew I needed a finish compatible with both the glue and the characteristics of the wood. It turned out that my range of finish choices was actually quite limited. A poured resinous finish would not quite suit the fine lines of this furniture. Remembering the boatbuilding past of Spanish cedar, I went with spar marine varnish. It's compatible with polyurethane glue and really brought out the deep, rich brown tones of the Spanish cedar. In fact, the finish is so rich that several knowledgeable woodworkers have since asked if the species is teak — something that wouldn't have MATERIAL LIST (THREE BENCHES) TxWx L 1 Bench Leg Lower Rails (6) 3/4" x 2%" x 1OVV 2 Bench Leg Upper Rails (6) 3/4" x 2'U"x 51/2" 3 Bench Legs (12) 3/4" x 2%" x 181/2" 4 Bench Leg Screw Plugs (30) 3/8" Dia. 5 Bench Seat Rails (6) 3/4" x 21/4" x 33" 6 Bench Seat Stretchers (3) 3/4" x 2V x 33" 7 End Slat Supports (6) 3/4" x 21A" x 10%" 8 Decorative Leg Appliques (12) 3/4" x 1" x 15%" 9 Bench Seat Slats (1) 3/4" x 3%" x 468" 10 Seat End Cleats (6) 3/4" x VU" x 10" 11 Seat Side Cleats (6) 3/4" x 1 W' x 33" happened with standard red cedar. After sanding the entire project down to 220 grit, I applied a thinned coat (25% paint thinner) of varnish as a sanding sealer. When the sealer was dry, I knocked down the surface with 400- and 600-grit wet/dry paper, then sprayed on three topcoats of unthinned varnish. The net result was a beautiful and durable finish on some sturdy outdoor benches. These benches are obviously designed to complement my circular picnic table, but we've found ourselves pulling them all around the place as convenient seating for backyard gatherings. & ._/ Miter the cleat ends and then soften the cuts with an orbital sander. Glue and clamp the cleats to the legsets. Use the scaled Bench Seat Template Drawing on the previous page to create a rigid template to trace the kidney-shaped benchtops on the seat slats. Cut the slats to approximate length, then chamfer the top edges. Screw them in place, using spacers to set each of the slats a uniform distance from its neighbors. These spacers are simply 8d common nails driven through a small piece of scrap, as shown in the previous article on page 55. Use the template you created to trace the shape onto the seat. Number and remove the slats, and cut their shapes on the band saw. Reinstall them on the legset, this time with screws and glue. 58 Outdoor Projects Summer 2004 £ |


